Development - Solving Custom 404 Error Pages with Cloudflare Workers
Ever had one of those days where nothing seems to go right? You’re trying to make your website perfect, but instead, it’s like the universe is playing a cruel joke on you. That was me recently, tangled in a web (pun intended) of frustrations while trying to set up a custom 404 error page for my website. Hosted with Docker and NGINX, my site stubbornly displayed the default NGINX ‘Page Not Found’ message instead of my sleek, custom 404 page. After countless failed attempts to fix it, I decided to call in reinforcements—Cloudflare Workers. If you’re nodding your head in sympathy, keep reading. This post is for you.
The Problem: NGINX Custom 404 Pages
Let’s set the scene: You’ve got your website hosted with Docker and NGINX. Everything’s going smoothly until you try to set up a custom 404 error page. Despite trying every configuration under the sun, NGINX insists on showing its own ‘Page Not Found’ message. Not only is this frustrating, but it also creates a jarring user experience. And let’s be honest, it’s not the impression you want to leave on your visitors.
This issue is more common than you might think, especially with custom hosting solutions. While a deep dive into NGINX configurations might eventually yield results, sometimes you just need a quick and effective solution. That’s where Cloudflare Workers come into play.

What are Cloudflare Workers?
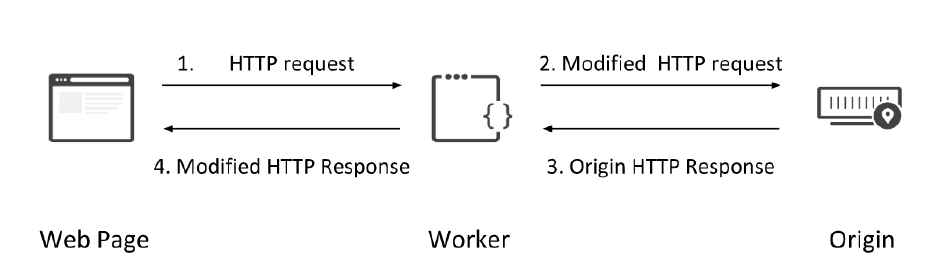
Think of Cloudflare Workers as your secret weapon. They are serverless functions that run on Cloudflare’s edge servers, allowing you to execute JavaScript code to handle requests and responses. This means you can manipulate traffic before it even hits your server, providing a faster and more flexible way to manage your website’s content. Since I was already using Cloudflare for DNS, DDoS protection, and security, adding Workers to my arsenal was an easy decision.
The Solution: Cloudflare Workers to the Rescue
Instead of endlessly tweaking NGINX configurations, I decided to let Cloudflare Workers handle my custom 404 page. Here’s how I did it:
- Set Up a Worker: First, I created a Cloudflare Worker to handle the incoming request and check for a 404 status.
- Fetch and Stream the 404 Page: If the response was a 404 and the request accepted HTML content, the worker would fetch my custom 404 page and return it.
- Deploy the Worker: Finally, I deployed the worker and set up a route rule to intercept 404 responses.
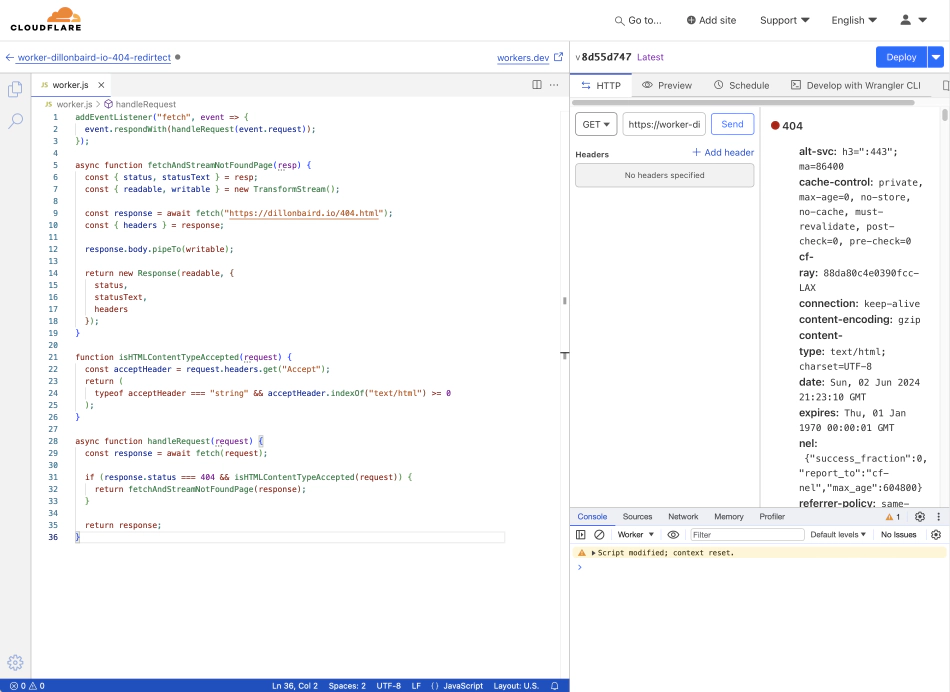
Here’s the magic code for my Cloudflare Worker:
addEventListener("fetch", event => {
  event.respondWith(handleRequest(event.request));
});

async function fetchAndStreamNotFoundPage(resp) {
  const { status, statusText } = resp;
  const { readable, writable } = new TransformStream();

  const response = await fetch("https://dillonbaird.io/404.html");
  const { headers } = response;

  response.body.pipeTo(writable);

  return new Response(readable, {
    status,
    statusText,
    headers
  });
}

function isHTMLContentTypeAccepted(request) {
  const acceptHeader = request.headers.get("Accept");
  return (
    typeof acceptHeader === "string" && acceptHeader.indexOf("text/html") >= 0
  );
}

async function handleRequest(request) {
  const response = await fetch(request);

  if (response.status === 404 && isHTMLContentTypeAccepted(request)) {
    return fetchAndStreamNotFoundPage(response);
  }

  return response;
}
Step-by-Step Guide
1. Create a Cloudflare Worker:
- Log in to your Cloudflare account.
- Navigate to the Workers page and create a new Worker.
- Copy and paste the above code into the Worker script (modify your domain / 404 page path obviously).
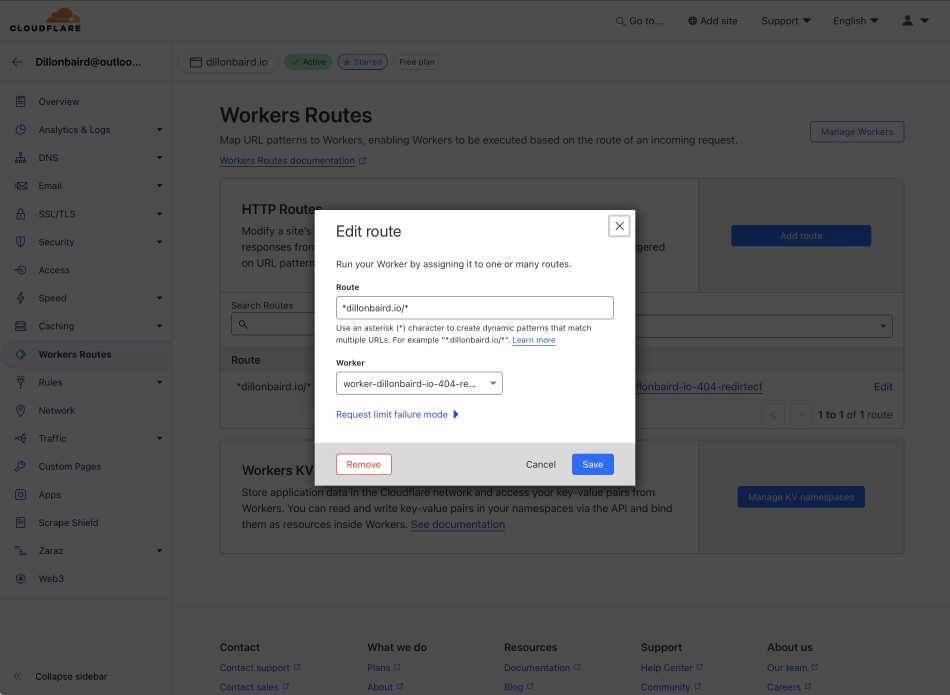
2. Set Up a Route Rule:
- On your website/domain page, go to the “Worker routes” section.
- Add a new route to match all requests to your domain (e.g.,
*dillonbaird.io/*). - Select the Worker you just created.
3. Deploy and Test:
- Save your Worker and route rule.
- Test your website by navigating to a non-existent page. You should now see your custom 404 page.

Why This Works
Leveraging Cloudflare Workers allowed me to quickly and efficiently solve my custom 404 error page issue. Let’s break down how the code achieves this.
Event Listener for Fetch Requests
addEventListener("fetch", event => {
  event.respondWith(handleRequest(event.request));
});
This snippet sets up an event listener that listens for fetch events. Whenever a request is made to your site, this event listener triggers and calls the handleRequest function, passing the request object to it.
Handling Requests and Fetching the Custom 404 Page
async function fetchAndStreamNotFoundPage(resp) {
  const { status, statusText } = resp;
  const { readable, writable } = new TransformStream();

  const response = await fetch("https://dillonbaird.io/404.html");
  const { headers } = response;

  response.body.pipeTo(writable);

  return new Response(readable, {
    status,
    statusText,
    headers
  });
}
This function handles fetching and streaming the custom 404 page. It first extracts the status and status text from the original response. Then, it creates a TransformStream to handle the readable and writable streams for the response body. It fetches the custom 404 page, pipes the response body into the writable stream, and returns a new Response object containing the custom 404 page with the original status and headers.
Checking for HTML Content Type
function isHTMLContentTypeAccepted(request) {
  const acceptHeader = request.headers.get("Accept");
  return (
    typeof acceptHeader === "string" && acceptHeader.indexOf("text/html") >= 0
  );
}
This function checks if the request accepts HTML content by examining the Accept header. If the header contains text/html, it returns true; otherwise, it returns false. This ensures that the worker only serves the custom 404 page to requests expecting HTML content.
Handling the Request
async function handleRequest(request) {
  const response = await fetch(request);

  if (response.status === 404 && isHTMLContentTypeAccepted(request)) {
    return fetchAndStreamNotFoundPage(response);
  }

  return response;
}
The handleRequest function fetches the original request and checks if the response status is 404 and if the request accepts HTML content. If both conditions are met, it calls fetchAndStreamNotFoundPage to fetch and return the custom 404 page. Otherwise, it returns the original response.
Conclusion
Using Cloudflare Workers to handle custom 404 error pages is a game-changer. It’s quick, efficient, and leverages the power of Cloudflare’s edge network. Plus, it saves you from the headache of fiddling with server configurations. Give it a shot, and let me know how it works for you!
FAQs
Answers to the most frequently asked questions.
What is a Cloudflare Worker?
A Cloudflare Worker is a serverless function that runs on Cloudflare’s edge servers, allowing you to execute JavaScript code to handle requests and responses.
How does Cloudflare Workers help with custom 404 error pages?
Cloudflare Workers can intercept 404 responses from your server and return custom error pages, improving user experience and SEO.
How do I set up a Cloudflare Worker?
Log in to your Cloudflare account, navigate to the Workers tab, create a new Worker, and paste the provided JavaScript code. Set up a route rule to match requests to your domain, select the Worker, and deploy it.
Can I use Cloudflare Workers for other tasks?
Yes, Cloudflare Workers can be used for various tasks such as caching, redirecting traffic, modifying responses, and enhancing security. They provide a powerful way to manage your website’s behavior at the edge.
Is using Cloudflare Workers cost-effective?
Cloudflare Workers offer a pay-as-you-go pricing model, making them cost-effective for both small and large-scale applications. Free up to 100,000 requester per day. 10m request per day on standard subscription @ $5 per month, with additional $0.30/month per additional 1m requests.
Share This Post
When I first slid on the Apple Vision Pro, I was bracing myself for another overhyped gadget. Instead, what I encountered was a transformative leap into the future of digital interaction. This wasn’t merely a high-tech toy; it was a tool that seamlessly wove itself into my daily coding rituals, shattering my preconceived limits of what technology could achieve. From that moment, I was hooked—immersed in a mixed reality that felt both groundbreaking and surprisingly intuitive.
Marcus Keller
Cornell Pichardo - www.shutterstock.com