Multi-WAN Bonding with OpenMPTCProuter
Unlike other solutions that claim to aggregate connections, Multi-Path TCP (MPTCP) actually does. See how I accomplished this using 2 Starlink terminals and multiple cellular hotspots
Introduction
A study predicts that by 2025, 36.2 million people will be working remotely, a significant increase from the 26% figure by 2022. Working from home is no longer the exception, but the norm. It’s important to have a stable internet connection, wherever you are. If your internet connection is poor, your bandwidth is limited, and your latency is too high, it can be difficult to collaborate and access resources.
I’m not just a remote worker adding to the statistic; I take it up another level and work full-time remotely from my boat. Not a wired connection to internet or power in sight; making the stable internet requirement even more challenging. In the past I was juggling multiple cell hotspots, having issues with throttling, tower congestion, or running out of data; later upgrading to Starlink yet still having issues due to latency or dropped packets.
Finally I don’t have to worry about any of that anymore by combining them all with OpenMPTCProuter!
I’m living the remote-working yachtie’s dream: always on, never throttled, always connected! With unlimited, fast and reliable internet anywhere, I’m getting a whole new perspective on remote-working. I no longer worry about running out of data… now I just worry about running out of rum! 😏
Background
Starlink performs quite well when it comes to typical Internet usage. I’ve used it for both voice and video calls, but I have high expectations for video calls. My experience with Starlink has generally been positive, with mostly good and sometimes great performance, but occasionally I have experienced disconnects and freezes during my video calls that lasted anywhere between a few seconds and up to 20 seconds. This may or may not be an issue for you depending on what you do for a living and how often you attend virtual meetings, but for me, it is not an acceptable issue.
It is my responsibility to lead or drive discussions during most of the meetings that I attend, so even minor issues with video during a virtual meeting can adversely affect the flow of the meeting and negatively affect the outcome. Plus, a minor video glitch can be distracting and make it hard to follow a meeting. Even though a 10-20 second outage might still allow work to continue, it becomes unprofessional very quickly. Tired of having to apologize every time my call froze while the boat was swinging at anchor, I had to take action.
One solution to improve internet connectivity is through bonding multiple connections. This method enhances both bandwidth and redundancy, particularly in remote or mobile settings. Using MPTCP (MultiPath Transmission Control Protocol) for bonding is an even better option as it allows for multiple connections to be utilized at the same time. It is much more reliable compared to traditional multi-WAN systems. MPTCP combines multiple internet connections, resulting in increased data transmission and improved reliability due to the multiple routes available in case of a failure.
By bonding multiple internet connections with MPTCP, a fast, low latency, and highly reliable connection can be achieved, which can be further customized and expanded to meet specific needs. MPTCP is like a multi-lane highway, allowing for more traffic to pass through, and if one lane becomes blocked, the other lanes can still remain functional. This allows for more reliable and efficient travel, as well as the ability to customize it to meet specific needs.
When compared to traditional strategies for WAN bonding and WAN fail-over, MPTCP offers a more robust and efficient network connectivity solution.
My Setup
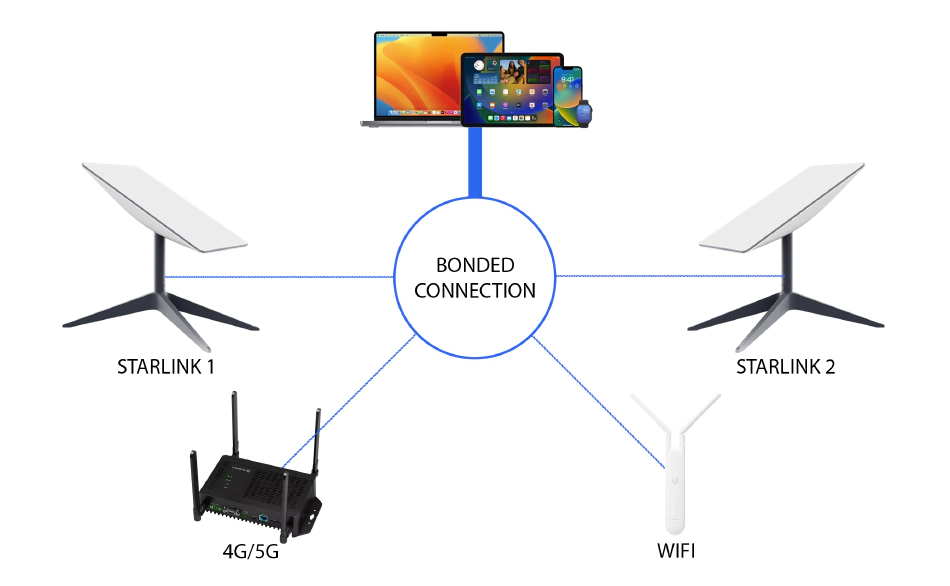
For my setup I am using two Starlink dishes (1 with residential plan + portability package; 1 RV plan), 1 5G LTE hotspot (on T-Mobile), 1 4G LTE hotspot (on Sprint), a Wi-Fi antenna which allows me to connect to marina wifi when available, an additional external ethernet cable connection so that I have full flexibility should a hardwired network connection become available at a marina or dock long term as well as my iPhone Hotspot (which will automatically be connected if within range). When using just the Starlink and LTE connections combined I get speeds in excess of 500Mbps download – combining Starlink with 5G actually makes for an extraordinary combination of both speed and low latency!
In this article, I explain why I recommend this custom multi wan bonding router setup over paid solutions, such as PepLink SpeedFusion. I also provide alternatives, and most importantly, explain how to do it yourself.
Having to pay through the nose for slow satellite solutions or spotty wifi connections at marinas is a thing of the past. There are a number of ways to get high speed internet today, including 5G LTE hotspots, external Wi-Fi antennas, 4G mobile hotspots, and even Starlink. As part of taking full advantage of all these connection options here on board M/Y Antigua, I have used OpenMPTCProuter to combine multiple WAN connections!
What is Bonding and MPTCP?
Bonding refers to the process of combining multiple network connections into a single logical connection, with the goal of maximizing bandwidth, improving reliability, and providing failover capabilities. Multipath TCP (MPTCP) bonding is a more advanced form of bonding, allowing for data to be transmitted over multiple network paths simultaneously. This provides numerous benefits over traditional multi-WAN load balancing, which simply distributes network traffic across multiple WAN connections in a round-robin fashion.
One of the key advantages of MPTCP bonding is its ability to dynamically adjust the data transmission path based on changing network conditions, resulting in improved overall performance. For example, if one network path becomes congested, MPTCP bonding can seamlessly switch to another path, ensuring a consistent and uninterrupted user experience. This is similar to how iPhones seamlessly switch from Wi-Fi to cellular data when Wi-Fi signals become weak. This dynamic adjustment of network paths makes MPTCP bonding a more efficient and reliable solution for users who require high-speed, low-latency network connectivity.
Why Bond Starlink with 5G/4G LTE?
From a constellation of satellites orbiting the Earth, SpaceX provides high-speed internet access through Starlink satellite internet service. With Starlink’s constellation of satellites, you can access the internet quickly and reliably from remote or mobile locations, but there are limitations. The service does not have the same latency as traditional LTE networks due to the distance between the satellites and the user. Also as the constellation is still filling out, there are still momentary packet-loss and interruptions in service depending on your location. To top it off, my setup being on a constantly moving platform with regularly changing conditions and obstructions can amplify these challenges even more so.
So a combination of Starlink and LTE connections let’s you benefit from the speed and unlimited bandwidth of Starlink, while using the low-latency cellular connection to give you the quickest connection; Increasing bandwidth, improving redundancy, and providing faster latency. If one of your connections momentarily drops, it’s covered by the other with a seamless hand off. This is the internet version of getting your cake and eating it too. The ability to use both systems will allow you to build a reliable connection that can handle pretty much anything.
Why Use Two Starlinks?
If you are using Starlink along with an alternate connection (like LTE, or marina Wi-fi connection), latency or packet drops are normally not an issue, since the alternate connection takes care of any packet loss or short disconnect in the network.
Being on a boat, you frequently can find yourself in places where there are no other options to connect so Starlink becomes your only option. It was important to me that I could take my vessel anywhere without worrying about how it would be set up or if I would be able to connect for work.
So I decided to get a second Starlink and configure them differently so that the chances of both experiencing a glitch at the same time are reduced. Yet how do you configure a Starlink differently if there is no configuration? As it turns out, as recently pointed out by another user, disabling the motors on one of the dishes can make for the perfect solution!
What makes this setup superior to paid solutions like SpeedFusion?
PepLink SpeedFusion is a commercial solution for bonding multiple internet connections. It is easy to setup and use, and it provides a lot of features, but it is expensive and limited in the number of connections you can bond. While PepLink SpeedFusion has many benefits, it does have some drawbacks, such as its high cost and limited connection capacity, which may not appeal to everyone. Also, SpeedFusion has a 200 Mbps cap. As a result, it is best for users who don’t need more than 200 Mbps of high-speed connection. In the case of higher demands, other solutions will be needed that are capable of supporting greater throughput and connections. In addition, SpeedFusion requires additional hardware to be set up properly, which may result in additional costs and installation time. As a result of SpeedFusion’s proprietary nature, it may not be compatible with all routers and hardware, so it is important to confirm compatibility before you spend any money.
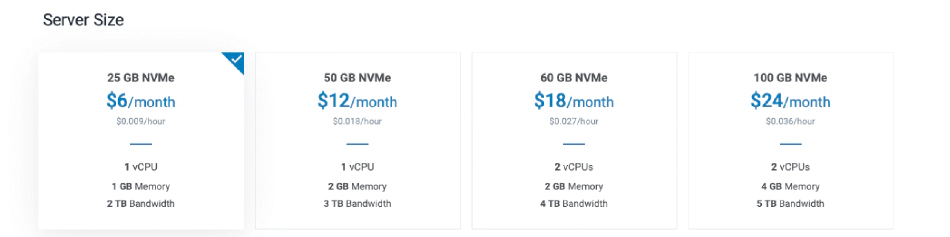
Meanwhile, OpenMPTCProuter is a free open source router that does not require any particular hardware. OpenMPTCProuter can be customized based on your needs and is free of charge apart from VPS bandwidth (I currently get 2TB/month for only $5). Furthermore, OpenMPTCProuter offers far higher connections and throughput than SpeedFusion, so it is an ideal solution for higher requirements, with only your hardware and connections limiting it. In addition to being free, OpenMPTCProuter allows you to bond as many connections as you need, and custom-tailor the setup according to your needs.
You can easily increase your connections and throughput by adding more connections, and it has a powerful set of features that let you customize the routing and bonding of connections to your needs.
Alternatives
Commercial Bonding / SD-WAN Options
For some, it just pays to not worry about things or have the desire to get into network device configurations. For those that fall into this category and are looking for a simple “plug & play” solution, I’ve listed the following:
-
PepLink SpeedFustion: A bonding technology developed by PepLink that allows users to combine multiple internet connections into one, faster and more reliable connection. With it, each connection’s bandwidth is combined into a single, unified connection that has a higher bandwidth and is more reliable, but it has its limits and costs. In addition to spending thousands on your Peplink box, you have to pay an additional $1,000 per year for SpeedFusion cloud service to access cloud servers and to enable real channel bonding. In the absence of the service add-on, your router is merely a load balancing device, so you can’t actually utilize the increased bandwidth for video conferencing, file uploads, and downloads.
-
Speedify: Speedify detects and integrates all the available internet connections on your computer, including Wi-Fi, mobile, Ethernet, and virtual private networks. This allows you to stream, play, and conduct other online activities more efficiently and reliably. Rather than operating at a network-level, Speedify is intended to be installed onto a single windows/macos computer (though there are ways to share the bonded internet connection out to other devices). Despite Speedify being a reliable service at a low cost, it is not available everywhere. Speedify is still not available in many parts of the world. It can be problematic for rural dwellers and travelers who travel to areas without Speedify.
-
Mushroom Networks: Mushroom Networks stands out in the commercial bonding and SD-WAN solution market, especially for businesses requiring dependable and secure networking. Their innovative Portable SD-WAN technology enables rapid network deployment in varied settings, offering enhanced security and efficiency. Although their solutions, such as the Broadband Bonding Network Appliances (BBNA), come at a higher cost, the premium is justified by unparalleled reliability and performance essential for mission-critical operations. For DIY projects like mine, the sophistication of Mushroom Networks’ offerings exceeds the requirements, with OpenMPTCProuter serving as a free alternative that suits my needs. Nevertheless, for organizations looking for robust, high-performance networking solutions to tackle complex connectivity challenges, Mushroom Networks is an excellent recommendation, perfectly aligning with professional and business-critical demands.
OpenMPTCProuter
How Does It Work?
Let’s take a look at how OpenMPTCProuter works now that we have discussed the benefits of bonding multiple Starlink connections with multiple LTE connections.
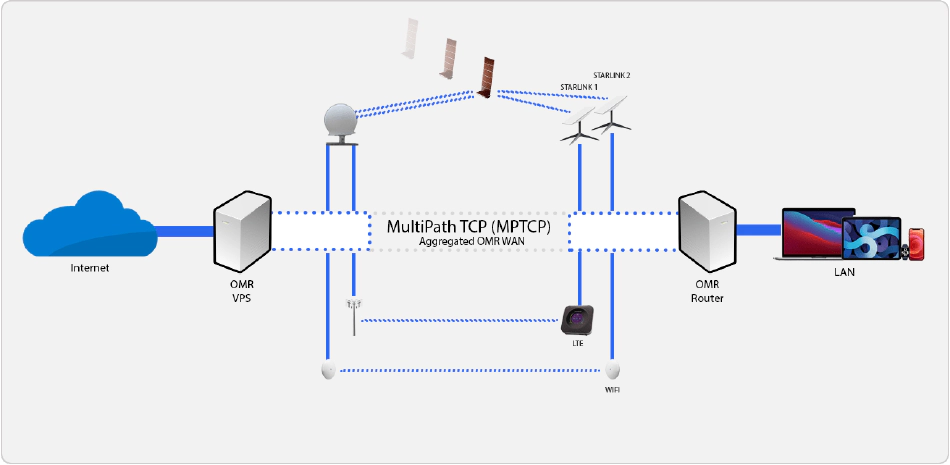
OpenMPTCProuter uses the Multi-Path Transmission Control Protocol (MPTCP) to combine multiple internet connections into a single virtual connection. MPTCP is an extension to the traditional TCP protocol, which allows multiple paths between two endpoints to be used simultaneously, enabling better resource utilization and increased reliability.
OpenMPTCProuter uses the Linux kernel’s built-in MPTCP implementation, which allows it to create and manage multiple network interfaces, each representing a different physical or virtual internet connection. These interfaces can be a mixture of wired and wireless connections, cellular networks, satellite links, and more.
When data is sent over the virtual connection, OpenMPTCProuter splits it into multiple sub flows and distributes them across the available network interfaces. The software dynamically monitors the performance of each connection and adjusts the distribution of traffic accordingly, sending more data over faster or more reliable links.
OpenMPTCProuter also implements a range of traffic management techniques to optimize the performance of the virtual connection. For example, it can prioritize certain types of traffic, such as real-time video or voice, to ensure a smooth and uninterrupted experience.
Overall, OpenMPTCProuter provides an efficient and flexible way to combine multiple internet connections into a single virtual connection, with improved bandwidth, reliability, and redundancy.
The Tech OpenMPTCProuter (OMR) uses:
- ShadowSocks-libev for TCP traffic between OMR and the VPS
- Glorytun for UDP and ICMP traffic between OMR and the VPS
Features
-
Aggregation: Bonding connections to really aggregate bandwidth from up to 8 internet connections with different characteristics : Fiber, xDSL, LTE (4G or 5G), Starlink/SpaceX Provide hybrid Internet with any ISP.
-
Fail-over: Always up with connection and server fail-over
-
Security: All data between the router and the server part are encrypted by default and can be obfuscated
Prerequisites
- Intel/AMD-based PC with Gigabit Ethernet, at least 1 GB of RAM, and a 8 GB storage or Raspberry Pi 4B(*) with those same specs and an microSD card
- 5+ port Gigabit switch
- 2 Internet connections or more - and modems can be xDSL, cable, 4G, fiber, Starlink/SpaceX, or whatever… (**)
- Cloud VPS with 1 GB of RAM and at least 1 vCore, as closest to you as possible (ping time matters!), with network speed greater than 120% of what you expect to achieve (***)
(*) You cannot use a Raspberry Pi 3B or less, unless you have less than 90 Mb/s of total Internet speed available, as the Ethernet port of the Pi 3B is limited to 100 Mbps total. Additionally, the Pi 3B’s CPU is slower which can cause problems with the bonding and trigger packet loss or cause the Pi to crash.
(**) You cannot use a FTTB deployment where you are provided only an Ethernet cable to your apartment that you plug into a router! Only ISPs which provide a modem/router can be used!
(***) Explanation: If you have 2x 50 Mbps connections that you want to bond into a 100 Mbps connection, your VPS should have at least 120 Mb/s network speed limit to account for protocol overheads. Actual results may vary. Ping from your home to the VPS should be less than 15ms.
Installation
Step 1: Set Up a VPS
The first step is to set up a virtual private server (VPS). This VPS will be used to host OpenMPTCProuter. Ideally, you should choose a provider that is located near your Starlink POP, so as to minimize latency and ensure maximum performance. In addition, having a VPS located in the same region as your Starlink POP will minimize any potential latency issues caused by routing. I use Vultr as my VPS provider.
Note: Pay attention to the terms of service for the VPS provider you choose; I had to change to Vultr after my VPS @ Google Cloud was flagged due to a crypto miner on my network that violated their terms.
Obtain a VPS, with Ubuntu 20.04 x86_64 or Debian 10 Buster x86_64, with at least 512 GB RAM (1 Go RAM is better) and 1 vCore. Make sure the network speed of the server is satisfactory, as that will be the maximum bonded speed you can achieve, and make sure the ping from your home connection is low (20ms or lower). It is best to pick a server in a datacenter in the same country as you. Note the server’s IP address.
The VPS/server need to have the lowest latency as possible with your connections.
I using a Vultr instance (with Linux Debian, 1GB RAM, 1 vCPU, 25GB NVMe & 2TB Transfer) at $6 per month.
Install/Update on Debian 10 Buster x86_64 Permalink
If you want IPv6, configure it on the server before running the script.
- Connect with SSH on your server
- You may need to update your server:
apt-get update && apt-get upgrade - Then, as root:
wget -O - https://www.openmptcprouter.com/server/debian10-x86_64.sh | sh
This will install and configure mptcp kernel, shadowsocks, glorytun and shorewall (as firewall). Key for shadowsocks and glorytun are generated by the script.
- SSH port is changed to 65222 (TCP)
- Shadowsocks port is 65101 (TCP & UDP)
- Glorytun port is 65001 (TCP & UDP)
- OMR JSON admin is 65500 (TCP)
- OpenVPN port is 65301 (TCP)
- MLVPN ports are 65201-65208 (UDP)
- Iperf3 on port 65400 (TCP & UDP)
- DSVPN port is 65401 (TCP)
- V2Ray port is 65228 (TCP)
After install, keys are saved in /root/openmptcprouter_config.txt file
root:~# cat /root/openmptcprouter_config.txt
SSH port: 65222 (instead of port 22)
Shadowsocks port: 65101
Shadowsocks encryption: chacha20
Your shadowsocks key: ************************************
Glorytun port: 65001
Glorytun encryption: chacha20
Your glorytun key: ************************************
A Dead Simple VPN port: 65401
A Dead Simple VPN key: ************************************
MLVPN first port: 65201'
Your MLVPN password: ************************************
Your OpenMPTCProuter ADMIN API Server key (only for configuration via API access, you don't need it): ************************************
Your OpenMPTCProuter Server key: ************************************
Your OpenMPTCProuter Server username: openmptcprouter
The SSH port will be changed to 65222, so use that to connect via SSH from now on.
VPS must be rebooted after installation.
To update OpenMPTCProuter server part, you have to download and run the script again. Keys will be preserved.
Step 2: Install the router image
The hard part is done, what’s left is to install the system image on the router. OpenMPTCProuter image is a fork of OpenWrt with added elements necessary to enable true WAN Bonding. Download Images Here .
For Raspberry Pi 4B: Download Raspberry PI 4B (64-bits) ext4-factory image, which is a .img.gz file.
Extract the file (you need to write it to the SD card with a tool like Balena Etcher. Insert the microSD card into the Raspberry Pi and proceed with the next step.
Step 3: Prepare Modems
To prepare the modems, you need to do the following:
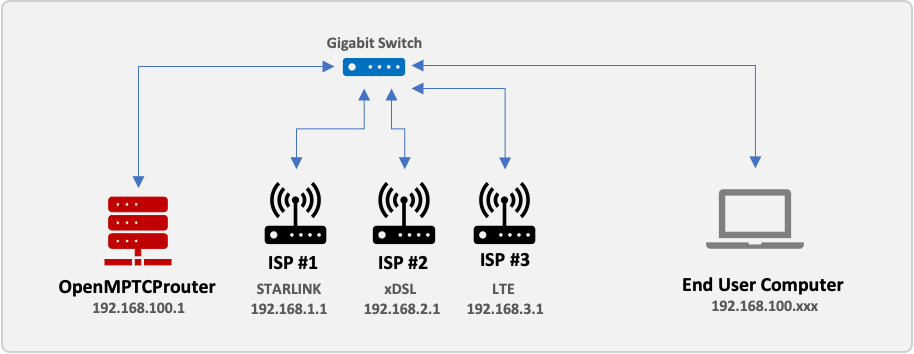
- Set the modems LAN IP addresses to 192.168.1.1 for the first, 192.168.2.1 for the second modem and 192.168.3.1 for the third modem…
- Turn off the modems DHCP server. It is very important that you don’t have multiple DHCP servers on the same network at the same time causing conflicts.
The exact ways to do this vary wildly depending on the model of your modem, but it is important to first change the IPs, and THEN disable DHCP. Failure to do so properly means you have to factory reset the modem or configure a static IP address on your PC to access the web UI of the modem.
Some devices such as Starlink do not allow you to change ip address; for those, you can install a small travel router in-between to get ip address control going to OMR. This will create a double-NAT in the WAN interface, but should not cause issue since the traffic piping to your VPS is single NAT.
My personal configuration is done differently, as I use VLANs paired with a managed switch to give me multiple WAN ports. I may expand this guide later to include this in the setup guide as well.
Step 4: Wiring It All Up
The wiring is actually super simple in this case, in contrast with the load balancing setup.
Take the Gigabit Ethernet switch, and plug into it the Three modems, the router (Raspberry Pi or Mini PC) and your own computer. Make sure all cables are functioning to spec, to avoid any problems.
Step 5: Configure OpenMPTCProuter
Once you have set up the VPS and the x86 micro PC, you can configure OpenMPTCProuter. This is done using the web interface.
To start, you will need to set up the interface for each connection. You will also have to enter IP addresses and subnet masks for each connection.
After that, you’ll need to configure bonding in the web interface. Click on the “Bonding” tab to do it. You can choose which type of bonding you prefer to use and which interfaces to bond. MPTCP bonding is more reliable than traditional bonding, so I recommend using it.
Having configured bonding, you should now set up routing. You can do this by clicking the “Routing” tab in the web interface. Here, you can set up the default route and individual interface routes.
Finally, you will need to set up the firewall. This can be done by clicking the “Firewall” tab in the web interface. Here you can configure the firewall rules and set up port forwarding.
You must put your computer in the same network as the OpenMptcpRouter router (the default OpenMptcpRouter network is 192.168.100.x and the OpenMptcpRouter is in 192.168.100.1).
- Open
https://192.168.100.1/and log in with the usernameroot(at default there is no password, leave it empty).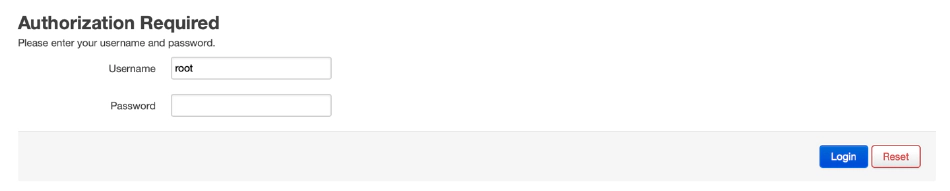
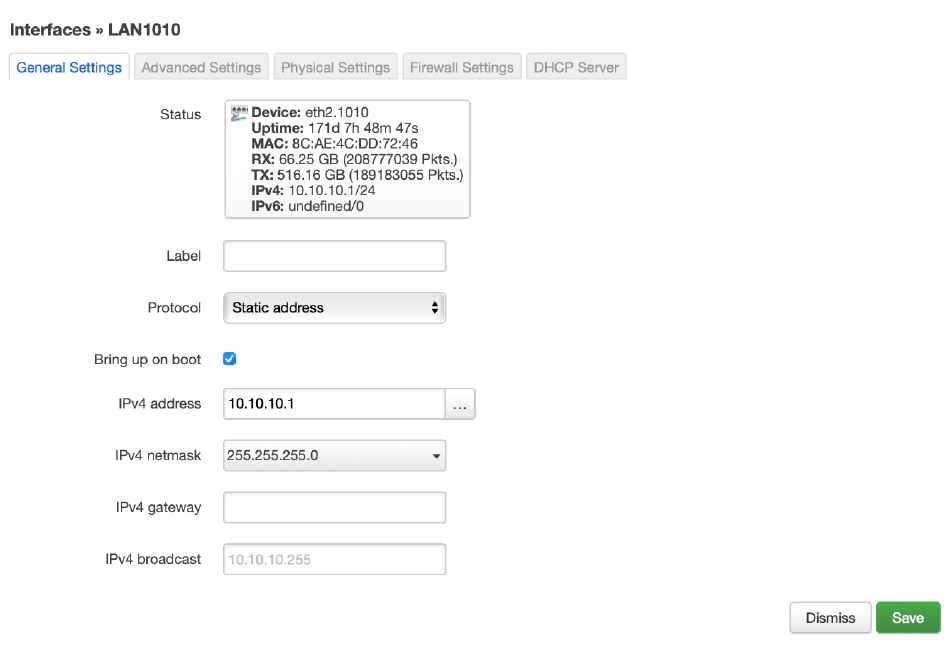
Your can change, the IP and the network of the OpenMptcpRouter: To do this, go to
Network –> Interfaces –> LANin OpenMptcpRouter GUI. Click toEditboton to change network parameters.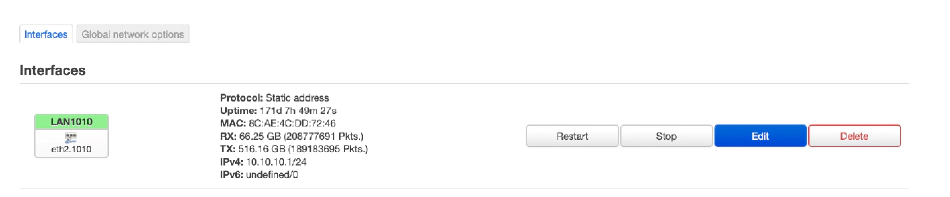
-
On the OpenMptcpRouter server VPS, open the
openmptcprouter_config.txtfile and copy theOpenMPTCProuter Server Keyvalue -
In the OpenMptcpRouter router GUI go to
System –> OpenMPTCProuter –> Settings Wizard, and enter theServer Keyand thepublic IPaddress of your VPS server.Scroll down to the two predefined interfaces, wan1 and wan2. Enter the labels, and the parameters as follows: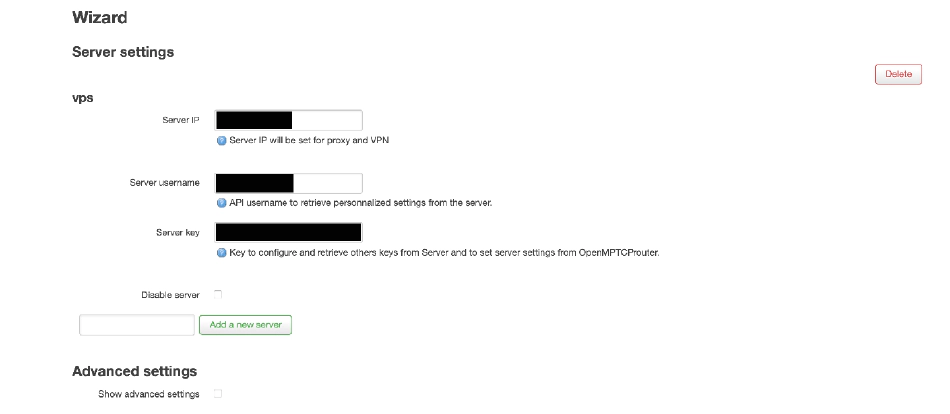
-
For WAN1: Protocol - Static address, IPv4 address - 192.168.1.42, Subnet mask - 255.255.255.0, IPv4 Gateway - 192.168.1.1
-
For WAN2: Protocol - Static address, IPv4 address - 192.168.2.42, Subnet mask - 255.255.255.0, IPv4 Gateway - 192.168.2.1
-
For WAN3: Protocol - Static address, IPv4 address - 192.168.3.42, Subnet mask - 255.255.255.0, IPv4 Gateway - 192.168.3.1
(the only difference is the IP subnet 192.168.1.0, 192.168.2.0, and 192.168.3.0 … as you configured in step 3.)
Click Save & Apply, and after a few seconds you will be redirected to the Status page (System –> OpenMPTCProuter –> Status). If everything is OK, it should look like this:
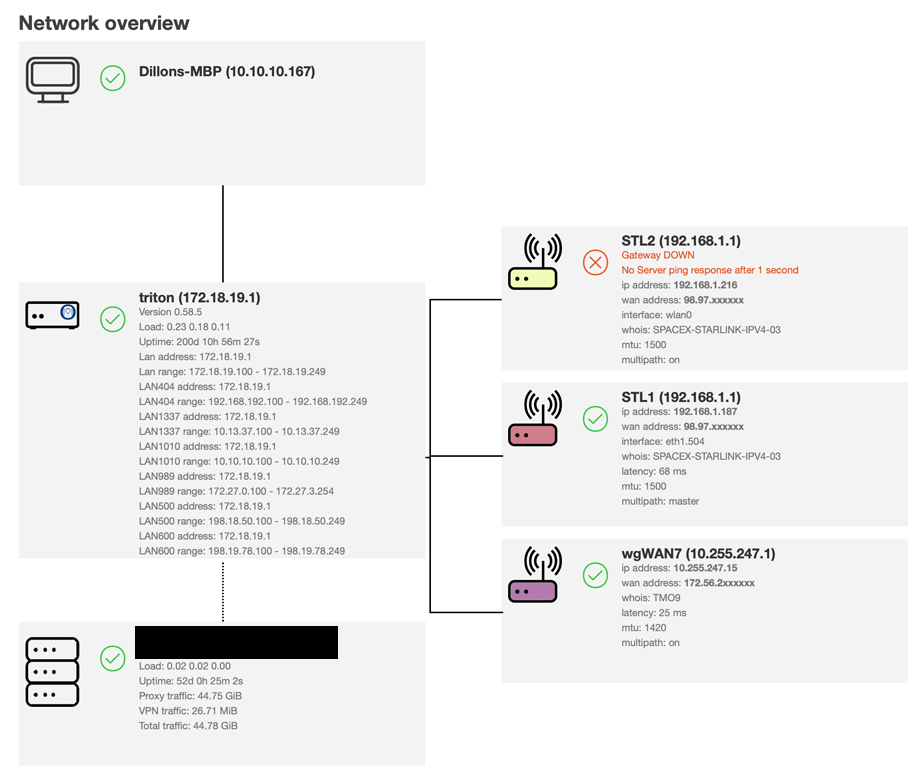
You can check egaly the Dashboard page

Thats it!
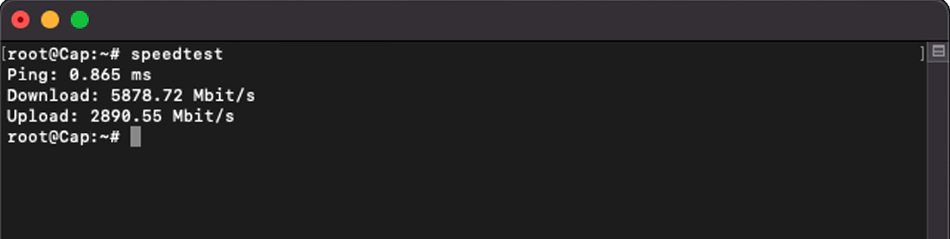
Step 6: Test the Connection
Once you have set up OpenMPTCProuter, you will need to test the connection. You can do this by connecting to the VPS and running speed tests for each connection. Speed tests can determine how well the router is distributing traffic across different uplinks and how well it is performing in terms of latency and throughput. This information can help you identify any issues and make adjustments if necessary. For example, if one of the uplinks has a lower latency than the other, you can configure the router to prioritize that connection over the other.
Updating OpenMPTCProuter
- Save the configuration:
(System –> Backup/Flash Firmware –> Backup –> Generate archive).
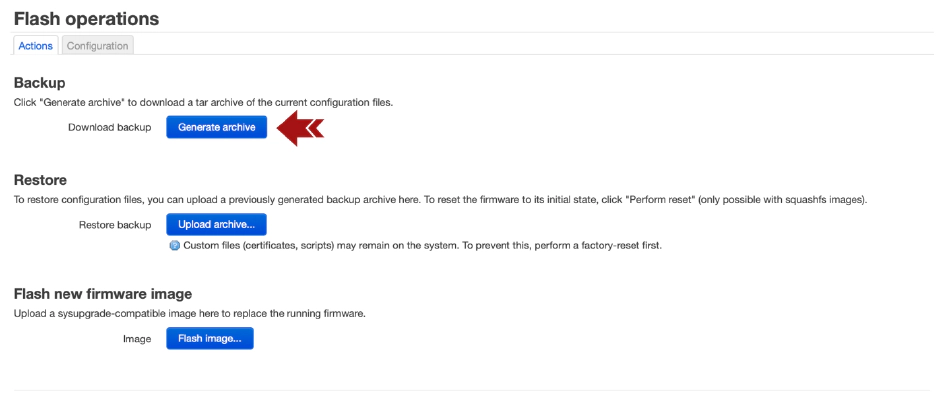
- Then 2 choices:
a. Write the latest image on the SD card, restore the configuration System –> Backup/Flash Firmware –> Backup –> Restore backup


Or
b. Download the image (.img) then use System –> Backup/Flash Firmware –> Backup –> Flash new firmware image (this can fail, you really should backup your configuration).

This can fail, you really should backup your configuration
Don’t update packages via the interfaces, current packages are from OpenWRT snapshot and this can break everything.
Tips
Blocked Sites
All internet flow that passes through aggregation is encrypted using a VPN. Your public IP becomes that of the VPS server.
Some services like NETFLIX, DISNEY+, APPLE TV+ … may be alarmist and block your access.
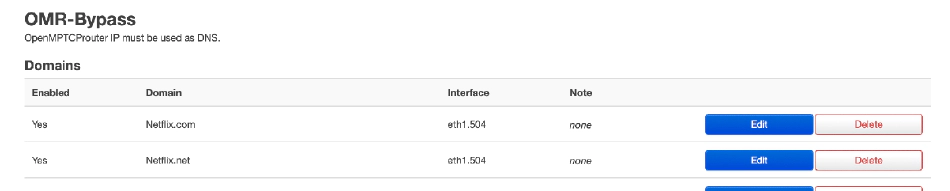
There is an option in OMR to work around this problem (OMR Bypass). In the OpenMptcpRouter router GUI go to Services –> OMR Bypass
-
Click
Addbutton inDomainssection
-
Configure the
Domainthat should bypass the aggregated VPN andSaveit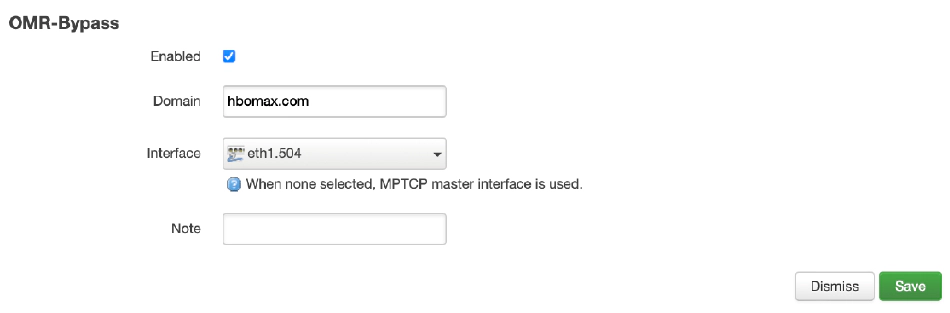
OMR-Bypass allows you to present to the site the IP of your WAN1, WAN2 or WAN3 … and thus to access the site.
- Click to Save & Apply
Custom DNS
By default OpenMPTCProuter uses root DNS servers. If you want to use some alternate DNS, in the router GUI go to Network –> DHCP and DNS
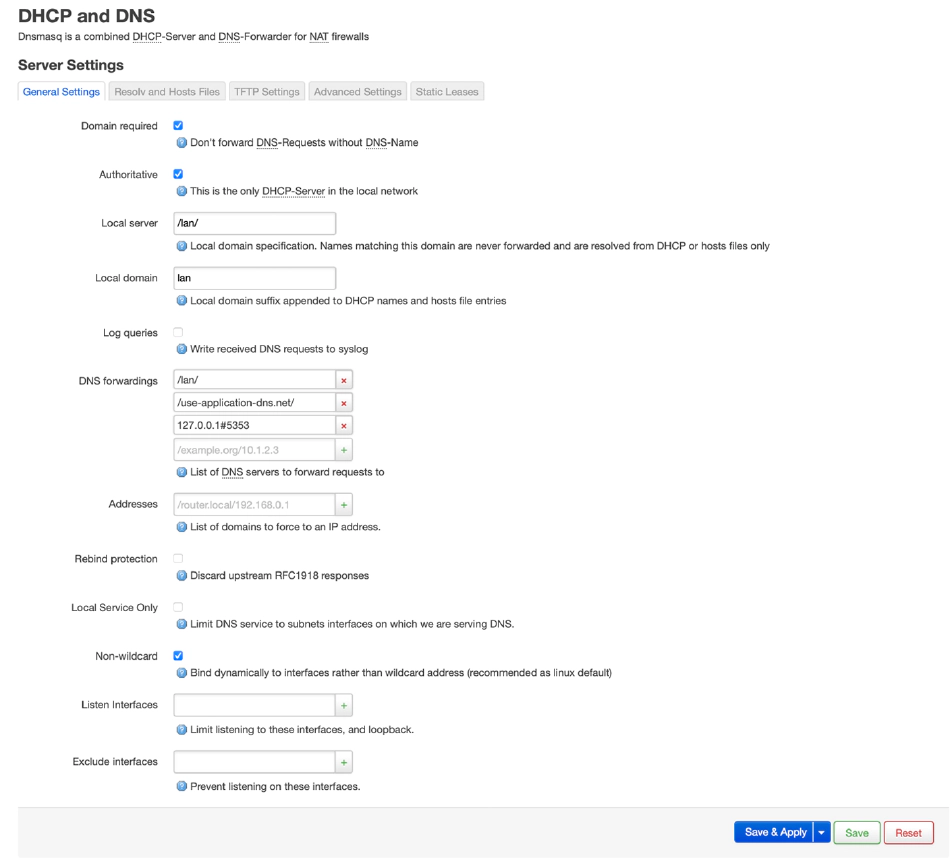
In DNS forwardings remove the 127.0.0.1#5353 default entry and add the server you want (ie. 9.9.9.9 for quad9 DNS):

Click Save & Apply
Testing Speed
There is several tools available on OpenMPTCProuter to test speed
omr-test-speed
-
To test aggregated download speed:
omr-test-speed -
To test a wan1 download speed:
omr-test-speed wan1 -
To test a wan2 download speed:
omr-test-speed wan2 -
To test aggregated download speed:
omr-test-speed tun0
Ctrl+C to stop after at least 2 minutes to have real speed.
omr-iperf
-
To test aggregated upload speed from server:
omr-iperf -
To test aggregated download speed to server:
omr-iperf vps -R
Where vps is the name of the VPS.
Inactive TCP Sessions Are Killed
For SSH, you can modify ServerAliveInterval in ssh configuration. You can also increase IPv4 TCP Keepalive time in the menu System –> OpenMPTCProuter –> Advanced Settings.

Increase IPv4 TCP Keepalive time and click Save & Apply
Get Systems Logs via SSH
You can get them with the command: logread
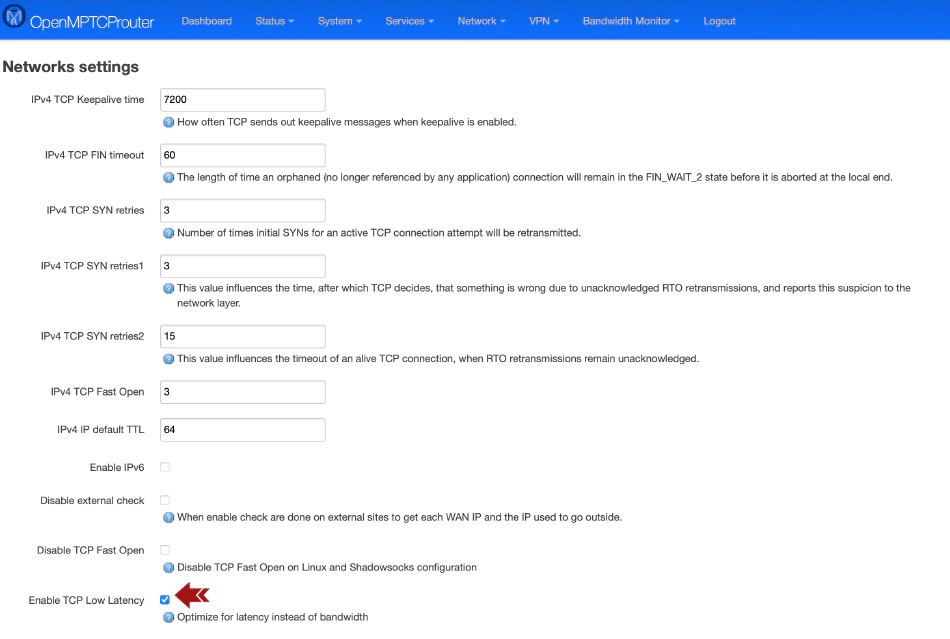
Select Primary WAN with best Ping
How to select primary WAN with best ping : Under System –> OpenMPTCPRouter –> Advanced Settings Enable TCP Low Latency And the master interface selection must be dynamically change.
Conclusion
When you are in a remote or mobile location, pairing multiple Starlink connections with multiple LTE connections is a great way to increase bandwidth and redundancy. In addition to providing more reliability than traditional multi-WAN setups, bonding with MPTCP makes it even better since you can use multiple connections simultaneously.
In addition to bonding as many connections as you need, OpenMPTCProuter allows you to customize the setup to meet your specific requirements. Moreover, OpenMPTCProuter is free, so you do not have to pay for a commercial solution. You can customize a bonding solution with OpenMPTCProuter to meet all your needs, while still enjoying a free solution’s cost savings.
It is my hope that this article has been helpful in explaining how to bond multiple Starlink connections with multiple LTE connections using OpenMPTCProuter. If you have any questions or comments, please feel free to leave them in the comment section below.
Last Updated: June 6, 2024
Jerry
Dillon Baird - DillonBaird.io
Ross
Dillon Baird - DillonBaird.io
Craig - www.mushroomnetworks.com
Dillon Baird - DillonBaird.io
Will
Cynthia Kennion - www.facebook.com
Melody Biddell - emeraldchat.chat
Margart Castiglia - wrex.marketminute.com
Joey Durr - tranhsonmaicuuhuyen.com